
EMMA LIM
Photoshop
SHoe Ad

In this advertisement, I added text, logo and an overlay. First of all, I took inspiration from the advertisement and put their slogan "Living Off the Wall" in a bold font that will catch people's eyes. Then I added the Vans logo to show what brand these shoes are and on the side like the advertisement. Finally, I added a dust overlay with a 61% opacity to make the advertisement kind o rustic looking. I decided to keep the background because I liked the aesthetic of it.

Tourism Ad
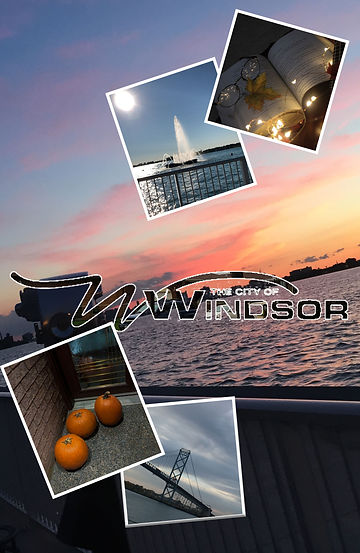

In my tourism ad, I used clipping masks, strokes, marquees, and logo as learned in class. First of all, I used the clipping masks to see through the logo and used strokes to outline it as well. Then, I used the rectangle marquee tool to make squares for the pictures. Finally, I got these pictures from my camera roll and used three of them from my 'Autumn' shooting assignment.
Glamour Shot
(SKin edit #3)
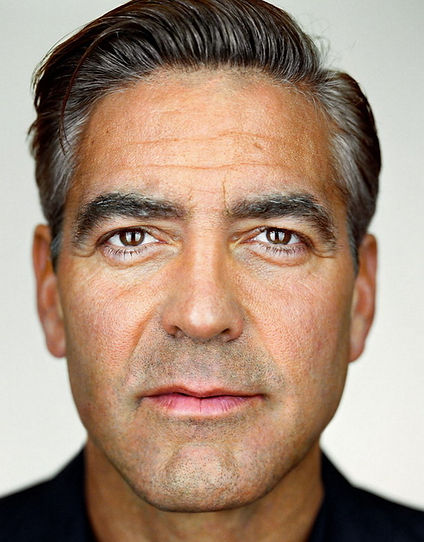
Before

After
In this skin edit, we used the methods learned in class such as contouring, filters, spot healing tools, hue/saturation image adjustments, vector tool, layer masks, and marquee tool. First of all, we got rid of George's eye bags, wrinkles, and blemishes with the spot healing tool. Then, we used the marquee and vector tool to add symmetry to his face and used layer via copy to do so. Next, we used hue/saturation image adjustments to colour his eyes and his hair. We also used some filters such as high pass and gaussian to smooth out his skin using layer masks. Finally, we contoured his face to using layer masks as well.
Multi Image Print ad

In this print ad, I used photos from my shooting assignment. It is composed of pots, pans, lego and yarn. That is because I wanted to make a scene with objects you wouldn't cook with. I did this by using the magic wand tool on the lego and yarn to get rid of their backgrounds. I also adjusted their brightness and contrast so that they would match the lighting in the photo. Finally I flattened the image and this was the end result.

Original
Liquify

Normal Liquify

Wacky Liquify

Original
